| |
Create a Hierarchical State Machine
Description: This tutorial teaches you how to nest different state machines, creating a hierarchical state machine.Tutorial Level: BEGINNER
Next Tutorial: Calling Actions from a SMACH State Machine
Creating some states
For this example, we create a number of states, each with a number of outcomes, input keys and output keys specified.
   1   # State Foo
   2   class Foo(smach.State):
   3      def __init__(self, outcomes=['outcome1', 'outcome2'])
   4
   5      def execute(self, userdata):
   6         return 'outcome1'
   7
   8
   9   # State Bar
  10   class Bar(smach.State):
  11      def __init__(self, outcomes=['outcome3', 'outcome4'])
  12
  13      def execute(self, userdata):
  14         return 'outcome4'
  15
  16
  17   # State Bas
  18   class Bas(smach.State):
  19      def __init__(self, outcomes=['outcome5'])
  20
  21      def execute(self, userdata):
  22         return 'outcome5'
Creating a hierarchical state machine
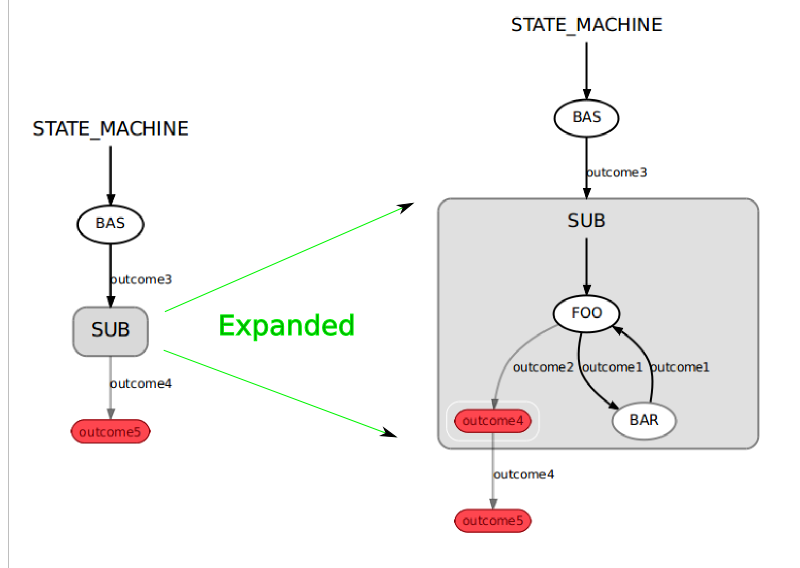
We create a top level state machine, and start adding states to it. One of the states we add is another state machine:
   1    # Create the top level SMACH state machine
   2     sm_top = smach.StateMachine(outcomes=['outcome5'])
   3
   4     # Open the container
   5     with sm_top:
   6
   7         smach.StateMachine.add('BAS', Bas(),
   8                                transitions={'outcome3':'SUB'})
   9
  10         # Create the sub SMACH state machine
  11         sm_sub = smach.StateMachine(outcomes=['outcome4'])
  12
  13         # Open the container
  14         with sm_sub:
  15
  16             # Add states to the container
  17             smach.StateMachine.add('FOO', Foo(),
  18                                    transitions={'outcome1':'BAR',
  19                                                 'outcome2':'outcome4'})
  20             smach.StateMachine.add('BAR', Bar(),
  21                                    transitions={'outcome1':'FOO'})
  22
  23         smach.StateMachine.add('SUB', sm_sub,
  24                                transitions={'outcome4':'outcome5'})
The result looks like this. The only point to take away from this is that every state machine is also a normal state. So you can add a state machine to another state machine in the same way you add a state to a state machine. So dealing with userdata is not any different when you deal with hierarchical state machines: the sub state machine specifies input and output keys, and they get remapped when you add the sub state machine to the top level state machine.

Example
This is a complete runnable example from the executive_smach_tutorials package.
Could not fetch external code from 'https://code.ros.org/svn/ros-pkg/stacks/executive_smach_tutorials/trunk/smach_tutorials/examples/state_machine_nesting2.py':
Running the example:
$ roscd smach_tutorials
$ ./examples/state_machine_nesting2.py


